前言 这篇介绍一下redux,还有react和redux联用的方法
Redux基本概念
redux官方文档:https://redux.js.org/api/api-reference
redux的工作流大概是这样的
Action Action用于表示提交的修改的类型
action必须是一个plain-object,它的__proto__必须指向Object.prototype
action中必须有type属性,该属性用于描述操作的类型,一般是字符串,也可以是其他类型
通常,使用payload属性表示附加数据
action创建函数应为无副作用的纯函数
为了方便利用action创建函数来分发action,redux提供了一个函数bindActionCreators,该函数用于增强action创建函数的功能,使它不仅可以创建action,并且创建后会自动完成分发。
最简单的action可以是下面这样的
1
2
3
4
{ type : "increase", payload : 1 }
这个action用于表示进行增加的操作
但我们一般会对action进行封装
1 2 3 4 5 6 7 8 9 10 11 12 13 14 15 16 17 18 19 20 21 22 export const ADD_USER = Symbol ("add-user" );export const DELETE_USER = Symbol ("delete-user" );export const UPDATE_USER = Symbol ("update-user" );export const createAddUserAction = (user ) => ({ type: ADD_USER, payload: user }) export const createDeleteUserAction = (id ) => ({ type: DELETE_USER, payload: id }) export const createUpdateUserAction = (id, newUserData ) => ({ type: DELETE_USER, payload: { ...newUserData, id } })
1 2 3 4 5 6 7 8 9 10 11 12 13 export const SET_LOGIN_USER = Symbol ("set-login-user" );export function createSetLoginUserAction (user ) return { type: SET_LOGIN_USER, payload: user } }
Reducer Reducer是用于改变数据的函数,它负责根据action的类型,进行实际的数据修改
一个数据仓库,有且仅有一个reducer,并且通常情况下,一个工程只有一个仓库,因此,一个系统,只有一个reducer
reducer必须是一个没有副作用的纯函数,它接收两个参数,返回新的state(不会和之前的state合并)
state:之前的状态
action:分发的action
reducer被调用的时机
通过store.dispatch,分发了一个action,此时,会调用reducer
当创建一个store的时候,会调用一次reducer,我们可以利用这一点,用reducer初始化状态
可以用combineReducers来合并reducer,得到一个新的reducer,该新的reducer管理一个对象,该对象中的每一个属性交给对应的reducer管理。
简单的reducer实例如下
1 2 3 4 5 6 7 8 9 10 11 12 13 14 import { SET_LOGIN_USER } from "../action/loginUserAction" const initialState = null export default (state = initialState, { type, payload }) => { switch (type) { case SET_LOGIN_USER: return payload default : return state } }
1 2 3 4 5 6 7 8 9 10 11 12 13 14 15 16 17 18 19 20 21 22 23 24 25 import * as usersAction from "../action/usersAction" let id = 0 ;function getId ( return id++; } const initialState = [ { id : getId(), name : "用户1" , age : 11 }, { id : getId(), name : "用户2" , age : 12 } ]; export default (state = initialState, { type, payload }) => { switch (type) { case usersAction.ADD_USER: return [...state, payload]; case usersAction.DELETE_USER: return state.filter(it => case usersAction.UPDATE_USER: return state.map(it => default : return state } }
1 2 3 4 5 6 7 8 9 10 11 12 13 14 15 16 17 18 import loginUserReducer from "./loginUser" import usersReducer from './users' import { combineReducers } from "redux" export default combineReducers({ loginUser: loginUserReducer, users: usersReducer })
Store 数据仓库对象,内部保存了数据
可以通过createStore方法创建的对象
该对象的成员:
dispatch:分发一个action
getState:得到仓库中当前的状态
replaceReducer:替换掉当前的reducer
subscribe:注册一个监听器,监听器是一个无参函数,该分发一个action之后,会运行注册的监听器。该函数会返回一个函数,用于取消监听
使用的示例如下
1
2
3
4
5
6
7
8
9
10
11
12
13
14
15
16
17
18
19
20
21
22
import { createStore } from "redux" ;import reducer from "./reducer" import { createAddUserAction, createDeleteUserAction } from "./action/usersAction" const store = createStore(reducer);console .log(store)const unListen = store.subscribe(() => { console .log(store.getState()); }) store.dispatch(createAddUserAction({ id: 3 , name: "sena" , age: 16 })); unListen(); store.dispatch(createDeleteUserAction(3 ));
redux的简单实现 因为redux的实现还是比较简单的,所以这里就简单模拟一下
1 2 3 4 5 6 7 8 9 10 11 12 13 14 15 16 17 18 19 20 21 22 23 24 25 26 27 28 29 30 31 32 33 34 35 36 37 38 39 40 41 42 43 44 45 46 47 48 49 50 51 52 53 54 55 56 57 58 59 60 61 62 63 64 65 66 import ActionTypes from "./utils/ActionTypes" import isPlainObject from "./utils/isPlainObject" export default function (reducer, defaultState ) let currentReducer = reducer, currentState = defaultState; const listeners = []; function dispatch (action ) if (!isPlainObject(action)) { throw new TypeError ("action must be a plain object" ); } if (action.type === undefined ) { throw new TypeError ("action must has a property of type" ); } currentState = currentReducer(currentState, action) for (const listener of listeners) { listener(); } } function getState ( return currentState; } function subscribe (listener ) listeners.push(listener); let isRemove = false ; return function ( if (isRemove) { return ; } const index = listeners.indexOf(listener); listeners.splice(index, 1 ); isRemove = true ; } } dispatch({ type: ActionTypes.INIT() }) return { dispatch, getState, subscribe } }
1 2 3 4 5 6 7 8 9 10 11 12 13 14 15 16 17 18 19 20 21 22 23 24 25 26 27 28 29 30 31 32 export default function (actionCreators, dispatch ) if (typeof actionCreators === "function" ) { return getAutoDispatchActionCreator(actionCreators, dispatch); } else if (typeof actionCreators === "object" ) { const result = {}; for (const key in actionCreators) { if (actionCreators.hasOwnProperty(key)) { const actionCreator = actionCreators[key]; if (typeof actionCreator === "function" ) { result[key] = getAutoDispatchActionCreator(actionCreator, dispatch); } } } return result; } else { throw new TypeError ("actionCreators must be an object or function which means action creator" ) } } function getAutoDispatchActionCreator (actionCreator, dispatch ) return function (...args ) const action = actionCreator(...args) dispatch(action); } }
1 2 3 4 5 6 7 8 9 10 11 12 13 14 15 16 17 18 19 20 21 22 23 24 25 26 27 28 29 30 31 32 33 34 35 36 37 38 39 40 41 42 43 44 45 46 47 48 49 50 51 import isPlainObject from "./utils/isPlainObject" import ActionTypes from "./utils/ActionTypes" function validateReducers (reducers ) if (typeof reducers !== "object" ) { throw new TypeError ("reducers must be an object" ); } if (!isPlainObject(reducers)) { throw new TypeError ("reducers must be a plain object" ); } for (const key in reducers) { if (reducers.hasOwnProperty(key)) { const reducer = reducers[key]; let state = reducer(undefined , { type: ActionTypes.INIT() }) if (state === undefined ) { throw new TypeError ("reducers must not return undefined" ); } state = reducer(undefined , { type: ActionTypes.UNKNOWN() }) if (state === undefined ) { throw new TypeError ("reducers must not return undefined" ); } } } } export default function (reducers ) validateReducers(reducers); return function (state = {}, action ) const newState = {}; for (const key in reducers) { if (reducers.hasOwnProperty(key)) { const reducer = reducers[key]; newState[key] = reducer(state[key], action); } } return newState; } }
1 2 3 4 5 6 7 8 9 10 export default function isPlainObject (obj ) if (typeof obj !== "object" ) { return false ; } return Object .getPrototypeOf(obj) === Object .prototype; }
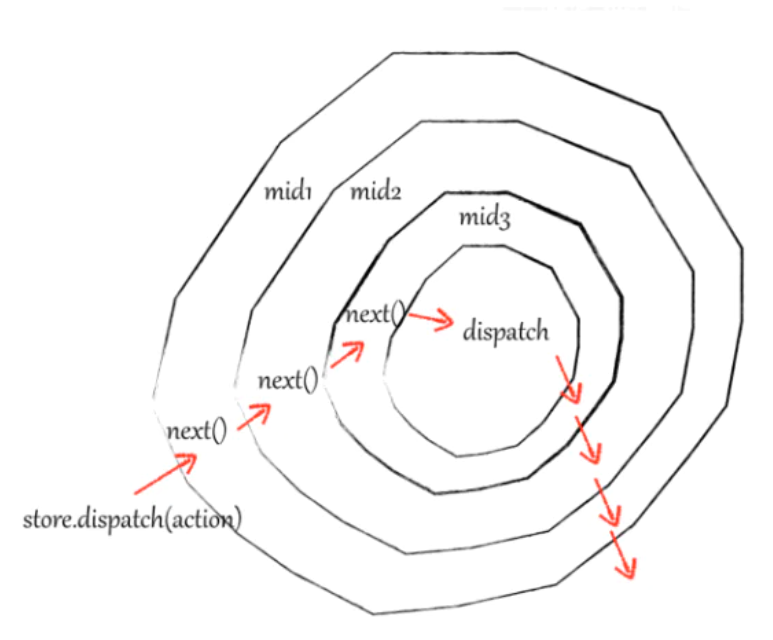
中间件 中间件类似于插件,可以在不影响原本功能、并且不改动原本代码的基础上,对其功能进行增强。
在Redux中,中间件主要用于增强dispatch函数,Redux中间件的基本原理,是更改仓库中的dispatch函数(缓存原来的dispatch,然后进行一层包裹,这样就可以增强dispatch的功能了)
包裹后就成了这样
举个例子,比如下面的代码
1 2 3 4 5 6 7 8 9 10 11 12 13 14 15 16 17 18 19 20 21 22 23 24 25 26 27 28 29 30 31 32 33 34 35 36 37 38 39 40 41 42 43 44 45 46 47 48 49 50 51 52 53 function M1 (store ) return function (next ) return function (action ) console .log('A middleware1 开始' ); next(action) console .log('B middleware1 结束' ); }; }; } function M2 (store ) return function (next ) return function (action ) console .log('C middleware2 开始' ); next(action) console .log('D middleware2 结束' ); }; }; } function M3 (store ) return function (next ) return function (action ) console .log('E middleware3 开始' ); next(action) console .log('F middleware3 结束' ); }; }; } function reducer (state, action ) if (action.type === 'MIDDLEWARE_TEST' ) { console .log('======= G =======' ); } return {}; } var store = Redux.createStore( reducer, Redux.applyMiddleware( M1, M2, M3 ) ); store.dispatch({ type : 'MIDDLEWARE_TEST' });
最后代码的运行顺序
1
2
3
4
5
6
7
8
9
10
11
12
13
14
15
16
17
18
19
20
21
22
-------------------------------------- | middleware1 | | ---------------------------- | | | middleware2 | | | | ------------------- | | | | | middleware3 | | | | | | | | | next next next ——————————— | | | dispatch —————————————> | reducer | — 收尾工作->| nextState <————————————— | G | | | | | A | C | E ——————————— F | D | B | | | | | | | | | ------------------- | | | ---------------------------- | -------------------------------------- 顺序 A -> C -> E -> G -> F -> D -> B \---------------/ \----------/ ↓ ↓ 更新 state 完毕 收尾工作
中间件处理的简单实现 首先,我们要有一个compose函数,用于组合函数
1
2
3
4
5
6
7
8
9
10
11
12
13
14
15
16
17
18
19
20
21
22
23
24
25
26
27
28
29
30
export default function compose (...funcs ) if (funcs.length === 0 ) { return args => } else if (funcs.length === 1 ) { return funcs[0 ]; } return funcs.reduce((a, b ) => (...args ) => a(b(...args))) }
然后在applyMiddleware中使用compose函数对dispath使用中间件包装即可
1
2
3
4
5
6
7
8
9
10
11
12
13
14
15
16
17
18
19
20
21
22
23
24
25
26
27
28
import compose from "./compose" export default function (...middlewares ) return function (createStore ) return function (reducer, defaultState ) const store = createStore(reducer, defaultState); let dispatch = () => { throw new Error ("目前还不能使用dispatch" ) }; const simpleStore = { getState: store.getState, dispatch: store.dispatch } const dispatchProducers = middlewares.map(mid => dispatch = compose(...dispatchProducers)(store.dispatch); return { ...store, dispatch } } } }
另外,我们要对createStore进行一些参数上的处理
1
2
3
4
5
6
7
8
9
10
11
12
13
14
15
16
17
18
19
20
import ActionTypes from "./utils/ActionTypes" import isPlainObject from "./utils/isPlainObject" export default function createStore (reducer, defaultState, enhanced ) if (typeof defaultState === "function" ) { enhanced = defaultState; defaultState = undefined ; } if (typeof enhanced === "function" ) { return enhanced(createStore)(reducer, defaultState); } }
这样就可以简单的模拟中间件的处理过程了
常用中间件 redux-logger 这个中间件用于打印一些日志,比我们自己写的好看,一般会把它放在中间件的最后一个
https://www.npmjs.com/package/redux-logger
1
2
import logger from "redux-logger" ;const store = createStore(reducer, applyMiddleware(logger));
redux-thunk
https://www.npmjs.com/package/redux-thunk
redux-thunk和redux-promise和redux-saga都是在用来在dispatch中处理副作用的
redux-thunk允许你的action是一个带有副作用的函数,当action是一个函数被分发时,thunk会阻止该action继续被移交(不调用next),而是直接调用函数
也就相当于做了一个拦截过滤而已
thunk会向函数中传递三个参数
dispatch:相当于store.dispatchgetState:相当于store.getStateextra:用户设置的额外参数
一个简单的例子
1 2 3 4 5 6 7 8 9 10 11 12 13 14 15 16 17 export const Set_User = Symbol ("set-user" );export const createSetUserAction = function (users ) return { type : Set_User, payload : users } } export function getAllUser ( return async function (dispatch ) let data = await getUserData(); dispatch(createSetUserAction(data)); } }
1 2 3 4 5 6 7 8 9 10 11 12 13 14 15 16 17 18 function getId ( return id++; } const initialState = []; export default (state = initialState, { type, payload }) => { switch (type) { case usersAction.Set_User: return payload; default : return state } }
1
2
3
4
5
6
7
8
9
10
11
import { createStore, applyMiddleware } from "redux" ;import reducer from "./reducer" import logger from "redux-logger" ;import thunk from "redux-thunk" import {getAllUser} from "./action/usersAction" ;const store = createStore(reducer, applyMiddleware(thunk, logger));store.dispatch(getAllUser())
redux-promise redux-promise中间件允许action是一个promise,它的内部流程如下
如果action是一个promise,则会等待promise完成,将完成的结果作为action触发
如果action不是一个promise,则判断其payload是否是一个promise,如果是,等待promise完成,然后将得到的结果作为payload的值触发。
否则,进行移交
1 2 3 4 5 6 7 8 9 10 11 12 export function getAllUserPromisify ( return new Promise (resolve => setTimeout (async () => { const data = await getUserData(); resolve(createSetUserAction(data)); }) }) }
1 2 3 4 5 6 7 8 9 10 11 12 13 14 15 import reducer from "./reducer" import logger from "redux-logger" ;import thunk from "redux-thunk" ;import reduxPromise from "redux-promise" import {getAllUser, getAllUserPromisify} from "./action/usersAction" ;const store = createStore(reducer, applyMiddleware(thunk, reduxPromise, logger));store.dispatch(getAllUserPromisify())
redux-saga
https://redux-saga.js.org/
redux-saga不仅可以用来处理异步操作,因为它提供了很多指令,所以你可以用它玩出各种花里胡哨的操作(代价就是用起来复杂了)
和之前两个中间件的区别是,之前两个中间件是把异步操作放在action中,saga是把异步操作放在saga中
在最开始时,要启动一个saga任务,在这个任务中可以使用指令,只要把指令放在yield后,saga中间件就可以捕获到指令,从而对不同的指令进行特殊处理,从而控制整个任务的流程(指令前面必须使用yield,以确保该指令的返回结果被saga控制)
PS:每个指令本质上就是一个函数,该函数调用后,会返回一个指令对象,saga会接收到该指令对象,进行各种处理
saga中间件会在saga任务完成后结束
下面是常用的saga指令
take指令:【阻塞】监听某个action,如果action发生了,则会进行下一步处理,take指令仅监听一次。yield得到的是完整的action对象
all指令:【阻塞】该函数传入一个数组,数组中放入生成器,saga会等待所有的生成器全部完成后才会进一步处理
takeEvery指令:不断的监听某个action,当某个action到达之后,运行一个函数。takeEvery永远不会结束当前的生成器
delay指令:【阻塞】阻塞指定的毫秒数
put指令:用于重新触发action,相当于dispatch一个action
call指令:【可能阻塞】用于副作用(通常是异步)函数调用(如果返回值是一个promise,等待promise完成,否则把返回值传入继续运行)
apply指令:【可能阻塞】用于副作用(通常是异步)函数调用(如果返回值是一个promise,等待promise完成,否则把返回值传入继续运行)
select指令:用于得到当前仓库中的数据
cps指令:【可能阻塞】用于调用那些传统的回调方式的异步函数(自动传入回调函数,并等待回调函数调用)
fork:用于开启一个新的任务,该任务不会阻塞,该函数需要传递一个生成器函数,fork返回了一个对象,类型为Task
cancel:用于取消一个或多个任务,实际上,取消的实现原理,是利用generator.return。cancel可以不传递参数,如果不传递参数,则取消当前任务线。
takeLastest:功能和takeEvery一致,只不过,会自动取消掉之前开启的任务
cancelled:判断当前任务线是否被取消掉了
race:【阻塞】竞赛,可以传递多个指令,当其中任何一个指令结束后,会直接结束,与Promise.race类似。返回的结果,是最先完成的指令结果。并且,该函数会自动取消其他的任务
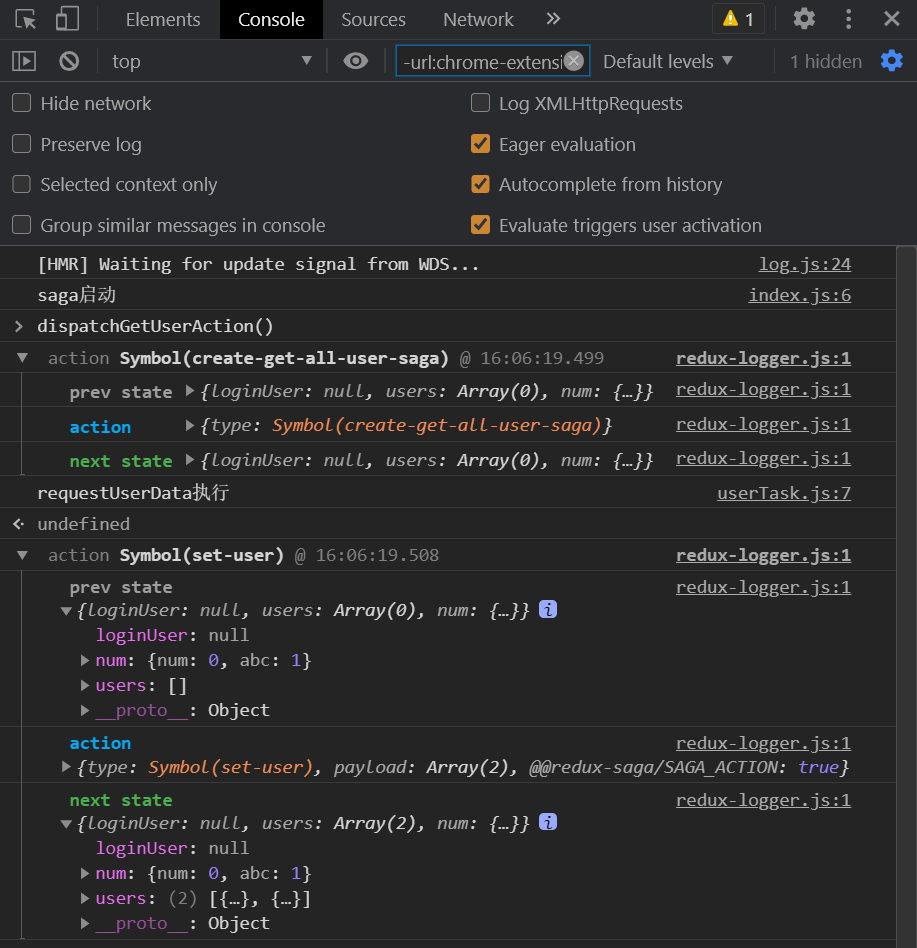
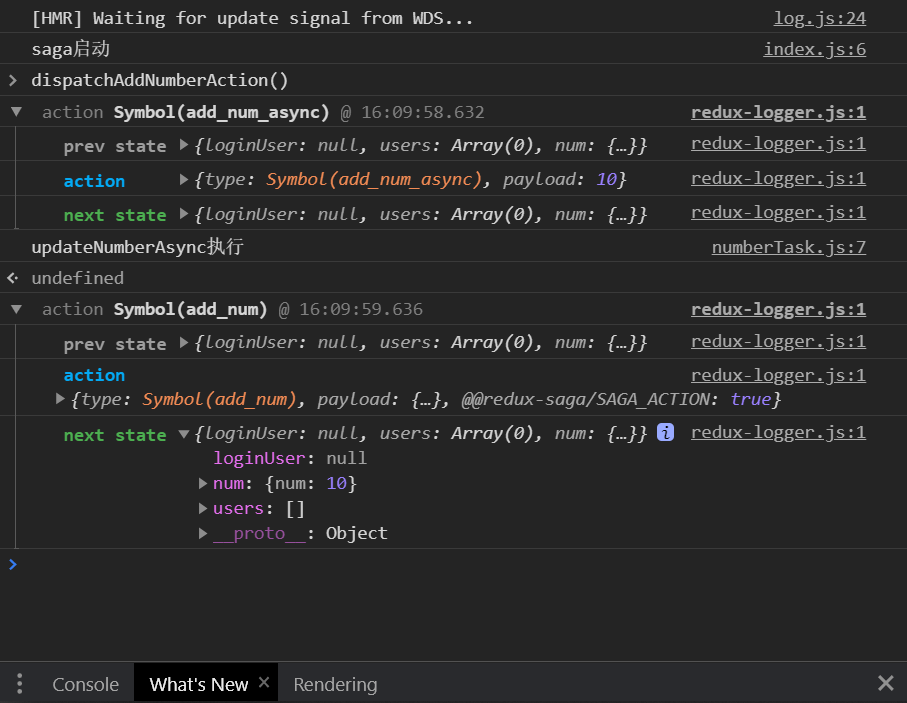
举个例子,还是用之前的请求用户的例子
1 2 3 4 5 6 7 8 9 10 11 12 13 14 15 16 17 18 19 20 21 22 23 24 25 26 27 28 29 30 31 32 33 import { createStore, applyMiddleware } from "redux" ;import reducer from "./reducer" import logger from "redux-logger" ;import thunk from "redux-thunk" ;import reduxPromise from "redux-promise" ;import createSagaMiddleware from "redux-saga" ;import { createAddUserAction, createGetAllUserSagaAction, Get_All_User_Saga_Action, getAllUser, getAllUserPromisify } from "./action/usersAction" ; import rootSaga from "../saga" ;import {createAddNumAsyncAction} from "./action/numAction" ;const sagaMid = createSagaMiddleware();const store = createStore(reducer, applyMiddleware(thunk, reduxPromise, sagaMid, logger));sagaMid.run(rootSaga); window .dispatchGetUserAction = function ( store.dispatch(createGetAllUserSagaAction()); } window .dispatchAddNumberAction = function ( store.dispatch(createAddNumAsyncAction(10 )); }
1 2 3 4 5 6 7 8 9 10 11 12 13 14 export const Get_All_User_Saga_Action = Symbol ("create-get-all-user-saga" );const addNumAsyncType = Symbol ("add_num_async" );export function createGetAllUserSagaAction ( return { type : Get_All_User_Saga_Action } } export function createAddNumAsyncAction (payload ) return { type : addNumAsyncType, payload } }
然后对saga的任务进行配置
1 2 3 4 5 6 7 8 9 10 import { all } from "redux-saga/effects" import userTask from "./userTask" ;import numberTask from "./numberTask" ;export default function *( console .log("saga启动" ); yield all([userTask(), numberTask()]); console .log("saga结束" ); }
1 2 3 4 5 6 7 8 9 10 11 12 13 14 15 import { takeEvery, put, delay} from "redux-saga/effects" import {addNumAsyncType, createAddNumAction} from "../store/action/numAction" ;function * updateNumberAsync (action ) console .log("updateNumberAsync执行" ); yield delay(1000 ); yield put(createAddNumAction(action.payload)); } export default function *( let userData = yield takeEvery(addNumAsyncType, updateNumberAsync); }
1 2 3 4 5 6 7 8 9 10 11 12 13 14 15 import { takeEvery, put, call, select } from "redux-saga/effects" import {createSetUserAction, Get_All_User_Saga_Action, Set_User} from "../store/action/usersAction" ;import {getUserData} from "../net/getUserData" ;function *requestUserData ( console .log("requestUserData执行" ); let data = yield getUserData(); yield put(createSetUserAction(data)); } export default function *( yield takeEvery(Get_All_User_Saga_Action, requestUserData); }
效果如下
常用中间件的实现 redux-thunk 非常简单,看看就行
1
2
3
4
5
6
7
8
9
10
11
12
13
14
15
function createThunkMiddleware (extra ) return store =>next =>action => if (typeof action === "function" ) { return action(store.dispatch, store.getState, extra); } return next(action); } } const thunk = createThunkMiddleware();thunk.withExtraArgument = createThunkMiddleware; export default thunk;
redux-promise 比上个复杂点,不过还是问题不大
1
2
3
4
5
6
7
8
9
10
11
12
13
14
15
16
17
18
19
20
21
22
23
24
25
26
27
28
29
30
import { isPlainObject, isString } from "lodash" import isPromise from "is-promise" export default ({ dispatch }) => next =>action => if (!isFluxStandardAction(action)) { return isPromise(action) ? action.then(dispatch) : next(action); } return isPromise(action.payload) ? action.payload .then(payload => .catch(error =>payload : error, error : true })) : next(action) } function isFluxStandardAction (action ) return isPlainObject(action) && isString(action.type) && Object .keys(action).every(key =>"type" , "payload" , "error" , "meta" ].includes(key)); }
redux-saga 头秃,写不动,有空再写orz
react-redux 用于连接redux和react
react-redux提供了一个Provider组件,它可以将redux的仓库放到一个上下文中,使用时需要传入redux的store
1
2
3
4
5
6
7
8
9
10
11
12
13
14
15
import React from 'react' ;import ReactDOM from 'react-dom' ;import { Provider } from "react-redux" import store from "./store/index" ReactDOM.render( <React.StrictMode> <Provider store={store}> <App/> </Provider> </React.StrictMode>, document .getElementById('root' ) );
然后加入一些action和reducer
1
2
3
4
5
6
7
8
9
10
11
12
13
14
15
16
17
18
19
20
21
22
export const actionTypes = { increase: Symbol ("increase" ), decrease: Symbol ("decrease" ), asyncIncrease: Symbol ("async-increase" ), asyncDecrease: Symbol ("async-decrease" ) } export function increase ( return { type : actionTypes.increase } } export function decrease ( return { type : actionTypes.decrease } } export function asyncIncrease ( return { type : actionTypes.asyncIncrease } } export function asyncDecrease ( return { type : actionTypes.asyncDecrease } }
1 2 3 4 5 6 7 8 9 10 11 12 13 14 import loginUserReducer from "./loginUser" import usersReducer from './users' import { combineReducers } from "redux" import {numReducer} from "./num" ;import counterReducer from "./counterReducer" export default combineReducers({ loginUser: loginUserReducer, users: usersReducer, num : numReducer, counter : counterReducer })
1 2 3 4 5 6 7 8 9 10 11 12 import { actionTypes } from "../../action/counter" export default function (state = 10 , { type } ) switch (type) { case actionTypes.increase: return state + 1 ; case actionTypes.decrease: return state - 1 ; default : return state; } }
编写一个Counter组件
1
2
3
4
5
6
7
8
9
10
11
12
13
14
15
16
17
18
19
20
21
22
23
24
25
26
27
28
29
30
31
32
33
34
35
36
37
38
39
40
41
42
43
44
45
46
47
48
49
50
51
52
53
54
55
56
57
58
59
60
61
62
import React from 'react' import store from "../store" import {increase, decrease } from "../store/action/counter" import { connect } from "react-redux" function Counter (props ) return ( <div> <h1>{props.number}</h1> <p> <button onClick={props.onDecrease}> 减 </button> <button onClick={props.onIncrease}> 加 </button> </p> </div> ) } function mapStateToProps (state ) return { number : state.counter } } function mapDispatchToProps (dispatch ) return { onDecrease ( dispatch(decrease()) }, onIncrease ( dispatch(increase()) }, } } export default connect(mapStateToProps, mapDispatchToProps)(Counter)
在这里出现了两个新概念
UI 组件:
只负责 UI 的呈现,不带有任何业务逻辑
没有状态(即不使用this.state这个变量)
所有数据都由参数(this.props)提供
不使用任何 Redux 的 API
容器组件
负责管理数据和业务逻辑,不负责 UI 的呈现
带有内部状态
可以使用 Redux 的 API
简单来说就是,UI 组件负责 UI 的呈现,容器组件负责管理数据和逻辑。
React-Redux 提供的connect方法,用于从 UI 组件生成容器组件。
可以看出来,使用还是非常简单的,只要使用connect方法对组件进行了一层高阶组件包装来获取数据就可以了
简单的react-redux实现 创建上下文 1 2 3 import React from "react" export default React.createContext();
提供Provider组件 1 2 3 4 5 6 7 8 import React from "react" import ctx from "./ctx" export default function Provider (props ) return <ctx.Provider value ={props.store} > {props.children} </ctx.Provider > }
实现Connect 1 2 3 4 5 6 7 8 9 10 11 12 13 14 15 16 17 18 19 20 21 22 23 24 25 26 27 28 29 30 31 32 33 34 35 36 37 38 39 40 41 42 43 44 45 46 47 48 49 50 51 52 53 54 55 56 57 58 59 60 import React, { PureComponent } from "react" import { bindActionCreators } from "redux" import ctx from "./ctx" ;export default function (mapStateToProps, mapDispatchToProps ) return function (Comp ) class Container extends PureComponent static contextType = ctx; getEventHandlers ( if (typeof mapDispatchToProps === "function" ) { return mapDispatchToProps(this .store.dispatch, this .props); } else if (typeof mapDispatchToProps === "object" ) { return bindActionCreators(mapDispatchToProps, this .store.dispatch) } } constructor (props, context ) super (props, context); this .store = this .context; if (mapStateToProps) { this .state = mapStateToProps(this .store.getState(), this .props) this .unlisten = this .store.subscribe(() => { this .setState(mapStateToProps(this .store.getState(), this .props)) }) } if (mapDispatchToProps) { this .handlers = this .getEventHandlers(); } } componentWillUnmount ( if (this .unlisten) { this .unlisten(); } } render ( return <Comp {...this.state } {...this.handlers } {...this.props } /> } } Container.displayName = Comp.displayName || Comp.name; return Container; } }
还是比较简单的,就是处理一下数据,进行转发而已
实现Connect-使用Hooks 1 2 3 4 5 6 7 8 9 10 11 12 13 14 15 16 17 18 19 20 21 22 23 24 25 26 27 28 29 30 31 32 33 34 35 36 37 38 39 40 41 42 43 44 45 46 47 48 49 50 51 52 53 54 55 56 import React, { useContext, useState, useEffect } from "react" import { bindActionCreators } from "redux" import ctx from "./ctx" ;function compare (obj1, obj2 ) for (const key in obj1) { if (obj1[key] !== obj2[key]) { return false ; } } return true ; } export default function (mapStateToProps, mapDispatchToProps ) return function (Comp ) function Container (props ) const store = useContext(ctx); const [state, setState] = useState(mapStateToProps && mapStateToProps(store.getState())) useEffect(() => { return store.subscribe(() => { let newState = mapStateToProps && mapStateToProps(store.getState()); setState(prevState => if (compare(prevState, newState)) { return prevState; } else { return newState; } }) }) }, [store]) function getEventHandlers ( if (typeof mapDispatchToProps === "function" ) { return mapDispatchToProps(store.dispatch, props); } else if (typeof mapDispatchToProps === "object" ) { return bindActionCreators(mapDispatchToProps, store.dispatch) } } let handlers = {}; if (mapDispatchToProps) { handlers = getEventHandlers(); } return <Comp {...state } {...handlers } {...props } /> } Container.displayName = Comp.displayName || Comp.name; return Container; } }
连接router和redux 有的时候,我们希望router中的一些数据要同步到redux中
这时候我们就可以使用connected-react-router
https://www.npmjs.com/package/connected-react-router
使用这个库的步骤比较繁琐,如下
修改reducer 1 2 3 4 5 6 7 8 9 10 11 12 13 14 import {connectRouter} from "connected-react-router" ;import {createBrowserHistory} from "history" ;const browserHistory = createBrowserHistory();export default combineReducers({ loginUser: loginUserReducer, users: usersReducer, num : numReducer, counter : counterReducer, router : connectRouter(browserHistory) }) export {browserHistory}
添加中间件 1 2 3 4 import reducer, {browserHistory} from "./reducer" import {routerMiddleware} from "connected-react-router" ;const store = createStore(reducer, composeWithDevTools(applyMiddleware(routerMiddleware(browserHistory), thunk, reduxPromise, sagaMid, logger)));
修改路由 1 2 3 4 5 6 7 8 9 10 11 12 13 14 15 16 17 18 19 20 21 import {ConnectedRouter} from "connected-react-router" ;import {browserHistory} from "../../store/reducer" ;function App (props ) return ( <ConnectedRouter history={browserHistory}> <Switch> <Route path="/page1" component={Page1} /> <Route path="/page2" component={Page2} /> </Switch> <ul> <li> <Link to="/page1" >页面1 </Link> </li> <li> <Link to="/page2" >页面2 </Link> </li> </ul> </ConnectedRouter> ) }
手动跳转的方法 如果你不使用Link或者NavLink,而是要手动跳转,要使用connected-react-router提供的push, replace函数
1 2 3 4 5 6 7 8 9 10 11 12 13 14 15 16 17 18 19 20 21 22 23 24 25 26 27 28 29 30 31 32 33 34 35 36 37 38 39 40 41 42 43 44 45 46 47 48 49 50 51 52 53 54 55 56 57 import React, {useCallback} from 'react' import {BrowserRouter as Router, Link, Route, Switch} from "react-router-dom" import RouteGuard from "../RouteGuard" ;import {ConnectedRouter} from "connected-react-router" ;import {browserHistory} from "../../store/reducer" ;import {push, replace} from "connected-react-router" ;import {connect} from "react-redux" ;function Page1 ( return <h1 > Page1</h1 > } function Page2 ( return <h1 > Page2</h1 > } function App (props ) let handleClick = useCallback(() => { props.toPage1(); }, [props.toPage1]) return ( <ConnectedRouter history={browserHistory}> <Switch> <Route path="/page1" component={Page1} /> <Route path="/page2" component={Page2} /> </Switch> <ul> <li> <Link to="/page1" >页面1 </Link> </li> <li> <Link to="/page2" >页面2 </Link> </li> <li> <button onClick={handleClick}>页面1 </button> </li> </ul> </ConnectedRouter> ) } const mapDispatchToProps = (dispatch ) => { return { toPage1 ( dispatch(push("/page1" )) } } } export default connect(null , mapDispatchToProps)(App)
FAQ & Ref 图解Redux中middleware的洋葱模型